Ring Leader Outfit

ThatsSoSavanna Carnival Party

ThatsSoSavanna Carnival Party

My little girl wanted a Circus party…. UGHHH so we compromised and she had a Carnival party and got to wear a Ring Leader outfit! It was so much fun (and exhausting) and she loved it!
www.facebook.com/photo.php?fbid=544389005632415&set=a.5426041258109…

Want to see her whole outfit, (romper, jacket, top hat and boots) click on this link and please while you are there LIKE her photo. She loves this boutique and really wants to win the photo shoot for them and the clothes for her!

If the response is there I will do another blog that shows how I made the different elements of her outfit, where I got the items and the pattern I used for her jacket!

Thanks all!

ThatsSoSavanna

http://www.ThatsSoSavanna.etsy.com

Cilantro Lime Salad Dressing

It’s getting warm here and during summertime I love to eat salad. It’s not so heavy that you feel exhausted and their is a lot of different styles to play with! My favorite salad dressing has to be Cilantro Lime. I love that I can go out in my garden and pick fresh ingredients and just whip it up! My kids even eat it! I think they like the idea that they helped grow, they helped “pick” the ingredients and they helped make it. After all their efforts they cannot help but want to try it. They especially like the salad spinner which we use to shake all the water off the cilantro after we wash it.
I purchased the salad dressing bottle from Wal-Mart but I’m sure you can find them other places too. I hope you enjoy it!

ThatsSoSavanna Cilantro Lime Salad Dressing

ThatsSoSavanna
Cilantro Lime
Salad Dressing

Cilantro Lime Salad Dressing
1/2 jalapeno pepper, seeded and coarsely chopped
1 clove of garlic
1/4 cup of lime juice
1/3 cup of honey
2 teaspoons balsamic vinegar
1/2 teaspoon of salt
1/4 cup packed cilantro leaves
1/2 cup extra virgin olive oil

Place the jalapeno pepper and garlic clove in a blender o food processor and blend until it is finely chopped.
Pour in the lime juice, honey, balsamic vinegar, and salt and add the cilantro leaves. Pulse a few times to blend.
Pour in the olive oil and blend until well incorporated with the dressing.

Ribbon Wall

YAY, the weekend is here!

So it’s not a full tutorial but awesome al the same. It’s photos of my ribbon wall from start to finish. I hope you like it! It really does make for a great weekend project. It is quick project that looks good and provides a ton of storage! Feel free to comment below with any questions you may have. ENJOY!

ThatsSoSavanna Ribbon Wall DIY

ThatsSoSavanna Ribbon Wall DIY


Painting the peg board

Painting the peg board


We cut the rain gutters to size and glued the side on with E6000

We cut the rain gutters to size and glued the side on with E6000


IMAG2684

This is the pieces you need to hold up the shelves and the single balls of string and ribbon. You can purchase these at Home Depot or Lowes.


Then you hand the Peg board on the wall, hang the rain gutter, put up the shelves and TA DA! It really was that easy and it looks amazing!

ThatsSoSavanna Ribbon Wall DIY

ThatsSoSavanna Ribbon Wall DIY

Do you have any fun weekend craft plans? I would love to hear about them. If you make a ribbon wall of your own I would love to see it. You can e-mail me at ThatsSewSavanna@yahoo.com or leave a comment below!


Workout Music


Savanna at The Color Run in Denver CO

Savanna at The Color Run in Denver CO


I’m one of those people that can be really motivated to get moving with the right kind of music. I recently started running walking with bounce and could use your suggestions.

A friend and I have a3.3 mile route we walk consistently and it’s been a great time to chat. Now that we have started to run the talking is much more….. well it’s just hard ya know with all that trying to breathe and all.

Here is my top 5 so far

  1. Imagine Dragons – On top of the World
  2. Calvin Harris – Feel So Close
  3. Imagine Dragons – It’s Time
  4. Neon Trees – Everybody Talks
  5. One Direction – What Makes You Beautiful

So what do you think? Send me your suggestions please! You can e-mail me or leave a comment below and share your must have workout songs!

Family Crossword Display Tutorial

ThatsSoSavanna Guest Tutorial by Heather from My Tutu Cute

ThatsSoSavanna Guest Tutorial by Heather from My Tutu Cute

I am sharing this amazing tutorial from my Sister in Law, Heather, from My Tutu Cute! Heather is a creative genius and my very best friend(so I might be slightly bias). She makes beautiful scrap tutus for any occasion you can think of! You should really check out her Etsy shop and see for yourself. You can also find her on Facebook here and her stand alone website Tutu Cute.
On to the tutorial!
Family Crossword Display
Supplies Needed
  • Wood board/plaque
  • 1-2 long wood sticks (sold at your local craft store)
  • Saw
  • Sandpaper and/or Acrylic Nail file
  • Tweezers
  • Vinyl letters or Sticker letters
  • 2 colors of paint
  • Burlap
  • Spray Adhesive
  • E6000 glue
  • Upholstery nails (sold at your local craft store)
  • Hammer

Step 1:  Cut your stick every 1/4 inch to make your squares

Step 1:  Saw your stick every 1/4 inch to make your square tiles

pic 2

Step 2:  Sand your tiles with sandpaper or what worked really well for me and acrylic nail file

pic 3

Step 3:  Attach your vinyl letters (or letter stickers you can buy from a craft or scrapbook store) to your tiles.  I found tweezers helpful with this step

pic 4

Step 4:  First, layout your letters into a crossword pattern you like.  It might take a few times moving names around to get it in the shape you like.
Second, measure your crossword horizontally and vertically
Lastly, take a picture of the crossword to reference incase any of your tiles get moved
pic 5
Step 5:  Paint your board and then let it dry.  (I painted mine with a mix of brown and black)
pic 6
Step 6:  Rub candle wax wherever you would like the color you just paint to show through and look aged.  (Rub hard)
pic 7
Step 7:  Paint your board with your other color of paint, it may need a coat or two.  Let dry.  Then sand until your board is weathered and aged to your liking.
pic 8
Step 8:  Cut your burlap at least 2 inches bigger than your measurement for your crossword.  If my crossword measured 10″x12″ I would cut my burlap 12″x14″.
Spray your burlap with spray adhesive and position it in the center of your board and press it in place.
pic 9
Step 9:  Hammer your upholstery nails into the edge of your burlap.  You could use more nails and have less space between nails or use less nails even as little as just the 4 corners all depending on your taste.
Remake your crossword on your burlap and then once all your pieces are in place glue them in position with E6000.
If you’d like you can finish your board off with attaching this poem with vinyl letters or sticker letters to the top and bottom of your board
I don’t think it just by chance, but by God’s Grand Design…
That He had guided all our steps to let your path cross mine.
pic 10
You’re Done!
pic 11
Variations
You can use scrabble tiles instead of cutting your own wood squares, you can also use mosaic tiles (they sell them in different sizes and colors at your local craft store)
Thanks Heather for sharing such an awesome tutorial! I think this will make GREAT family Christmas gifts!

ThatsSoSavanna is catching up

ThatsSoSavanna has had a very busy start to Spring! With lots of new projects filling my schedule I am anxious to hear what you are all up to too?

I have been doing a little here and there and even start exercising more.

Of course there has been a lot of Spring cleaning going on. Take a little peak at my craft room.

ThatsSoSavanna Craft Room

ThatsSoSavanna Craft Room

Remember this fabulous Fairy Garden I made with my daughter?

ThatsSoSavanna Fairy Garden

ThatsSoSavanna Fairy Garden

We added something new to it! Can you spot what’s different?

ThatsSoSavana New Fairy Garden

ThatsSoSavana New Fairy Garden

If you noticed the Fairy lanterns you are right! I made these using a slice of the wood like I did for the stepping stones. I drilled a small hole and made a shepard hook with metal wire. To make the actual lantern I drilled two very small holes in the top of an acorn. I made a beautiful glass bead that had a swirly bottom to attach to the acorn. I love how it turned out. It is the perfect little touch!

ThatsSoSavanna Fairy Garden with new Fairy Lanterns

  ThatsSoSavanna Fairy Garden with new Fairy Lanterns

ThatsSoSavanna Handmade Fairy Lantern

ThatsSoSavanna Handmade Fairy Lantern

Our vegetable garden has surprised us with something new too! My kids are so excited to watch the Strawberry plants grow!

ThatsSoSavanna Strawberry plant

ThatsSoSavanna Strawberry plant

This past weekend I caught my daughter outside chomping on a mouthful of this!

ThatsSoSavanna Cilantro Plant

ThatsSoSavanna Cilantro Plant

That’s right, it’s Cilantro! She loves it and had to bring some in to make Dad try it too!

That’s some of the things keeping me busy, what are you up to?

I can’t wait to hear about your new Spring projects and just between you and me there will be a GIVEAWAY coming up for all of my ThatsSoSavanna followers!

So Savanna Vegetable and Fairy Garden

So we have been working hard in the gardens lately. The vegetable garden is totally finished and the fairy garden is really close! I love gardening, it makes me feel so accomplished and productive.

ThatsSoSavanna Fairy Garden

My husband and son have been building bird houses lately so I thought a fairy garden was the perfect project t do with my little girl.

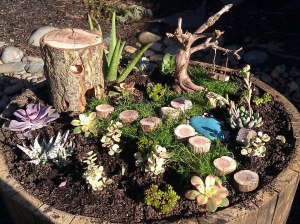
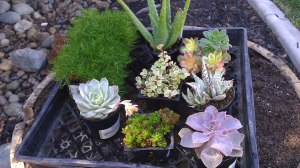
We purchased a whisky barrel planter to make it in and several succulents to plant. The succulents are pretty and whimsical but also low maintenance. We through in some Aloe plants too for all the “summer fun” that is soon to come.


ThatsSoSavanna Fairy House ThatsSoSavanna Fairy plants

We collected several stick, stumps and Misc. treasures just walking around our neighborhood. I love the little stump turned fair house.

You can see it in the pictures but the inside of the fairy house windows is painted with glow paint so it lights up at night. My daughter likes to guess what the little fairy’s are awake doing, she usually goes with “they are reading”.

My favorite is probably the twisted roots stick we used to hang a little fairy swing on.

ThatsSoSavanna Fairy Garden


This is the little vegetable garden we have growing. We have: Strawberries, Cilantro, Jalapeno, Chocolate Mint, Zucchini, Squash, Cantaloupe, Watermelon, Tomatoes, Artichoke, and Cucumbers.

ThatsSoSavanna Vegetable Garden

Are you planting a garden this year? What are you going to grow?

I’m sure in the next few months I will have tons of things to say and pictures to show from our gardening adventure!

Savanna

www.ThatsSoSavanna.etsy.com

www.ThatsSoSavanna.thecraftstar.com


What new with ThatsSewSavanna

I’m keeping busy an I have lots I want to show you!

Hair Spiral Bead collage This was really fun to make! I have several glass spiral beads I like to wear in my hair and my little girl always ohhh and ahhs over them BUT I ‘m hesitant to let her wear them because they’re glass!! So I made her some (none glass) of her own and I swear she squealed with delight! I’m thinking these are perfect for a girly Easer Basket! I’m thinking of maybe offering a blog follower discount on these and putting them in my shop for a limited time so let me know if you would be interested!


IMAG2761I searched all over for one of these jugs and it was worth the wait! I purchased the lighted twigs on clearance after Christmas and I love how they look in the old milk jug!


IMAG2767 I wish this picture came o better because this fabric is fabulous! It matches all the assortment of colors I have in the room!


IMAG2814  This project was super fun and my little girl had to wear it immediately. I will have a tutorial for ho you can make your own dangly feather hair clip soon.


IMAG2709 My Spinning display rack! AHHHHH I LOVE THIS! I will have a full tutorial with pictures for you to see how truly awesome his is. I will post this in the next week or two!


Friday Feature

This weeks feature is AshleyAfterDark

Ashley in her own words:

“I am an artist that loves trying new ideas and projects. I specialize in designing an assortment of gorgeous and unique alcohol ink products. You will find a very colorful variety of coasters, tiles, framed art, motivational and inspirational art pieces, as well as upcycled and repurposed jewelry. I am also in the process of adding a new line of trendy magnets. As time progresses I continue to branch out on new adventures in order to create fresh and new products.

Getting to view the final product is by the far the best part of the whole process. I have somewhat of an idea what it’s going to look like just from the colors that I have applied,  but the high gloss glaze is really what completes it in order to make the colors POP!”

Favorites from Ashley’s shop! Click the image to go directly to her item in AshleyAfterDark on Etsy and see more pictures and details.

il_570xN_418428116_noyp il_570xN_420371505_5wd1 il_570xN_424389640_8cij                             Go check out her shop!